
Discover how the East Kent coast has fought off an invasion from human and natural forces on this easy walk from Walmer to Deal
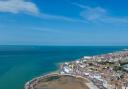
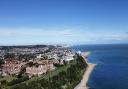
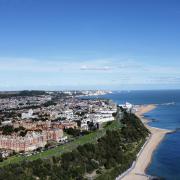
The coast between Walmer and Deal has long been on the front line of invasion.
Its flat shores and proximity to Europe have attracted overseas attackers from Caesar’s Roman legions to Napoleon’s warships, from First World War bombers to Hitler’s planned invasion just 80 years ago.
But humans are not the only threat to this part of Britain’s coast, where the soft chalk cliffs face constant attrition from the sea. Eroded by waves and attacked by storms, the coastline has both shrunk and grown, creating a marginal, shifting landscape.
This flat, easy route offers a beautiful coastal walk from the medieval village of Walmer to the trendy seaside town of Deal while considering the changing fate and fortunes of a coast ‘on the frontline’.
Here we highlight some of the stories you’ll uncover as you walk.
To the manor born

Our walk begins in Upper Walmer, an inland village where, if you look closely, you can still get a sense of its medieval origins.
Peek over the wall of Old St Mary’s church, and you’ll see the romantic stone and flint remains of Walmer Court. Built in the 12th century, this was once the manor house – the beating heart of the village – which owned and controlled the land and the villagers' lives.
Unlike its flashier neighbour Deal, today, Upper Walmer feels out of the way, off the beaten track even. But this is no accident.
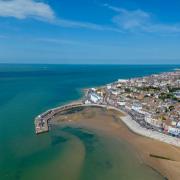
Thanks to its proximity to the coast, Walmer’s fate has long been linked to the sea. From at least the 18th century, a spit of land grew northwards from Walmer to Deal.
Deal saw it as an opportunity and built onto the new land, growing from a small town into a seaside resort. Upper Walmer was left as a quiet semi-rural village, much of it relatively unchanged from its medieval layout.
Henry’s castles
")
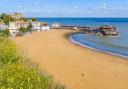
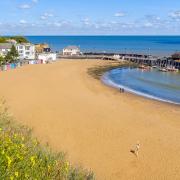
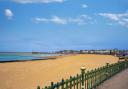
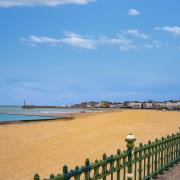
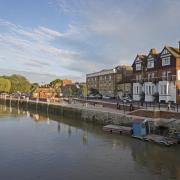
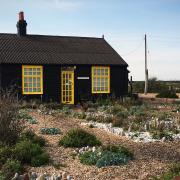
The low, level shore between Walmer and Deal with its long promenade can be a delightful place to stroll. In summer, the shingle beach is aflame with salt-tolerant plants like pink sea pea, sea kale and wild carrot.
Britain’s most infamous monarch, Henry VIII, saw the weakness of this flat coast, however – seeing in it an ideal landing place for an invading enemy. He built not one, not two, but three castles in a short stretch: at Walmer, Deal and Sandown. Known as artillery forts, they were built to an innovative design with wide, flat platforms designed for firing what was then the very latest weapon: gunpowder.
Ships’ graveyard

Four miles off the coast of Deal lie the deadly Goodwin Sands, a nine-mile long sandbank that has been the undoing of many unwary ships. It’s said that more than 2,000 vessels have been wrecked on the Sands over the centuries.
It even features in Shakespeare, when, in The Merchant of Venice, a character speaks of ‘…the Goodwins I think they call the place – a very dangerous flat and fatal shore, where the carcasses of many tall ships lie buried…’
On a clear day, you can see the French coast 25 miles away, but unless the tide is out, the Goodwin Sands lie invisible, hidden by waves.
Hellfire Corner

The close proximity of East Kent to France hasn’t always been positive. During the Second World War, this area of Kent became known as Hellfire Corner due to the devastation wrought by German attacks.
In January 1944, tragedy came to a quiet, residential area of North Deal when 12 women and children died in a civilian shelter.
They were bombed by shells fired across the channel all the way from the French coast. Shell fragments from the guns were even found as far inland as Chatham and Maidstone.
These are just a few of the stories you’ll uncover on this walk. A short route description and maps feature below, along with information on where to find and follow the full route information.
Walmer and Deal walk
Start: Walmer Railway Station, CT14 7RN
Length: 6 miles
End: Deal Railway Station, CT14 6HD
OS map: Explorer 150 Canterbury and the Isle of Thanet, Explorer 138 Dover, Folkestone and Hythe.

Directions
1) Walmer railway station
Walk down Station Drive, left into Station Road, then left into Neville Gardens to enter St Mary’s churchyard by a footpath on the left. Keep the church on your left and exit through a wooden gate to stop by a wooden fence with a ruined building beyond.
2) The Church of the Blessed Mary, Church Street
Turn right down Church Street, then right into Dover Road and continue up the hill. Pass a church and the Thompson’s Bell pub. Stop at the back of number 381 Dover Road by a shoulder-high brick wall.
3) Back of 381 and 385 Dover Road
Retrace your steps downhill, then turn right into Grams Road. At Liverpool Road, cross over and enter a small car park. Walk up the steep steps on the right to Hawkshill Down and follow the path on your right towards a line of trees to the war memorial.
4) Hawkshill Down
Walk past the memorial along a narrow path, continuing ahead along a hedged path. Walk across an open field toward houses. At the field's edge, go straight forward, following a yellow sign along a sunken tarmac footpath. At a crossroads, bear left, taking the path uphill. Pass a church on the right. At the junction with Upper Road, turn left then ahead into South Road. Pass a row of cottages on your left to stop by The Zetland Arms.
5) The Zetland Arms pub, Wellington Parade, Kingsdown
With the pub on your left, follow the stone path and walk along the promenade to continue along Wellington Parade. Stop at Walmer Castle.
6) Walmer Castle
Continue along the beach-side path. Where the path splits off right toward the sea, stop by the privet hedge for a good view of the modern housing estate set back from the road.
7) Lord Warden Estate, Lord Warden Avenue
Continue along the beach-side path. Stop at the low grey square monument on the left, just in front of number 12, The Beach.
8) Julius Caesar plaque, Walmer Green
Continue along the path until you reach the RNLI Lifeboat Station (a grey tiled building resembling a church.)
9) Walmer Lifeboat Station
Continue along the seaside path. Pass the bandstand. Walk across the grass to Strand Street. Turn right; pass North Barracks Road and Cheriton Road on the left. Stop outside a long brick building with a clock tower.
10) Admiralty Mews Houses, Strand Street
Continue walking in the same direction towards Deal and stop when you reach Deal Castle.
11) Deal Castle
Continue ahead in the direction of the pier. Stop by the fishing boats drawn up on the beach.
12) Beach opposite Prince of Wales Terrace
Continue along the promenade for a short distance. Look for the tall building across the road with the cross and large ball on the roof.
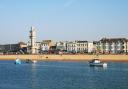
13) Deal Time ball Tower Museum, Victoria Parade
Continue along the Prince of Wales Terrace, then left into South Street, then immediately into the remains of tiny, narrow Beach Street. Continue ahead to stop at the entrance to the pier.
14) Deal Pier
Walk along the promenade to The Royal Hotel.
15) The Royal Hotel, Beach Street
Continue along the promenade and stop opposite the three-storey, red-brick Adelaide House on the corner of Griffin Street.
16) Deal Promenade
Continue to Hengist Road. Turn left and stop by The Cannery.
17) The Old Cannery, Hengist Street
Turn left into Sandown Road and continue until you reach Alfred Square on the right. Turn left into the High Street, then take the next right into Water Street, then left into Robert Street.
18) Corner of Robert Street and Clarence Place
Continue along Robert Street. At the end, turn left into Duke Street, then cross the High Street. Bear left into New Street, then cross over Middle Street. Stop by Golden Street.
19) Golden Street
Go back into Middle Street. Turn left and stop a short way along.
20) Middle Street
Continue along Middle Street, then turn right into Oak Street. At the end, carefully cross the road and stop outside the old Town Hall.
21) Deal Town Hall, High Street
Continue along the High Street, then turn right into Queen Street to follow the signs for Deal Railway Station.
Discover more at: www.discoveringbritain.org